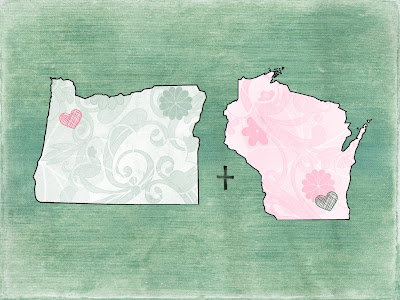
 Well, I didn't cut mine out of paper and I thought I'd share how YOU can do it too!
1. Download some free digital scrapbook paper (I got mine from Shabby Princess).
2. Open a free online photo editor like Pixlr. I will be using Pixlr as my example, but you can achieve similar results with Photoshop and other editors like that.
3. Click "Open image from computer." Open whatever background digi-scrap paper that you want as your background.
4. Double click the box for the "background" layer to change it from the lock symbol to being a checked box. Now you can manipulate this layer. Change the image size to whatever size you want. For our purposes we will do a 300 dpi image in a 5"x7" size, so go to IMAGE --> IMAGE SIZE. Uncheck the "constrain proportions" selection. Input 2100 for width and 1500 for height. This will give you a high resolution image that will be printed at a 5x7 size.
5. Search Google (or your preferred search engine!) for an outline of his/her home states. Make sure they are copyright free if you are planning to sell these images (and make sure your digital scrapbook paper is also copyright free if you are selling--Shabby Princess does NOT release rights to sell items made with their paper). Save a copy of the state outlines to your computer.
6. Open a new image from your computer (do this twice--once for each state you have). Using the magic wand tool (3rd down on the left side of the toolbar in Pixlr), select the area outside the state outline. DELETE so that you have only the state showing, with transparency all around it. Go to EDIT --> INVERT SELECTION. This should select only the state. If there are words or anything else around your state you will need to erase them before selecting the state. COPY (Ctrl+C) this selection.
7. Go back to your scrapbook paper background image (via the down arrow under "Login/Sign Up" in the top right corner). PASTE the state selection into this image (Ctrl+V). It will create a new layer automatically. REPEAT with other state.
8. Position each state where you want them. If the size needs to be adjusted, go to EDIT --> FREE TRANSFORM. This will not keep your proportions, so check to make sure you don't totally skew your (or his!) state out of whack! Be sure to leave a little room in between for the plus sign. :)
9. Fill each state with the paint color of your choice. (Or if you want a design like my example, continue through the rest of the "9" steps.)
9a. Open another scrapbook paper with a strong design (with good contrast of lights and darks). I prefer just a design without a lot of extra colors, but you pick what you like! Doubleclick the background layer to make it "manipulatable."
9b. Select your entire paper (Ctrl+A) or use the selection tool (the blue square 2nd from the top left on the toolbar) to select whatever part of the design you want. Define it as a brush (EDIT --> DEFINE BRUSH or Ctrl+K).
9c. Return to your original scrap background page and select the layer with your state. Using the MAGIC WAND tool, select the white interior of your state.
9d. Select the BRUSH tool and pick whatever color you want. Go to the dropdown brush menu (the top light gray tool bar and scroll down through the brush options to the end, where your new creations will be. Select your brush and use it as is, or resize it smaller. Click one time over the white interior of the state. Voila! There is a super cool background on just your state! (Ctrl+Z will undo and you can change color/etc. if you want to adjust it.) REPEAT from 9c for the other state.
10. ADD a layer on top of everything else. On the layer toolbar, the square with a turned up corner next to the recyling can will add a layer. Move the layer to the top.
11. Select the BRUSH tool. Go to the drop down menu for brushes and click MORE. Click the drop down menu and select MISC, then click HEARTS. Select ADD to add all the heart brushes to your brush selection.
12. Select whichever heart brush you like best. I have found the darker looking ones show up better. Resize your heart brush to whatever size you like.
13. Using a contrasting color, click your heart brush once (or twice if it is not dark enough) over the approximate area where you grew up in your state. REPEAT for his state.
14. Using the brush tool with a darker/contrasting color from your background, draw a "plus" sign in between your states. Or, you can do it the hard way by finding a plus sign online and creating a brush like in step 9b. Just delete any white part (you may have to turn up the "tolerance" to get it really good) you want to be transparent, then Ctrl+K to define the brush.
15. Save your image as a jpg and then send it to the store to print!

No comments:
Post a Comment